deepin 25 OS Installation Guide
Current applicable version: deepin 25
Last updated: April 2026
1. Pre-Installation Preparation
As an open-source operating system that has performed impressively and gained wide recognition among global users on DistroWatch, since the official release of deepin 25, we have been continuously listening to the community, refining details, fixing issues, and introducing innovations. Today, we are pleased to announce the release of the deepin 25.1 ISO image!
1.1 Hardware Requirements
| Component | Recommended Configuration (Smooth Operation) |
|---|---|
| Processor | Intel 6th Gen Core (3.2 GHz) or AMD Zen2 (3.6 GHz) and above |
| Memory | At least 8 GB |
| Storage | At least 64 GB SSD |
| Boot Mode | UEFI (Legacy mode available for older devices prior to 2012) |
| Graphics | Integrated or dedicated GPU (NVIDIA 8xx series and newer; older models have no official driver support) |
| Display | 1920×1080 or higher resolution |
⚠️ If your RAM is less than 8 GB or your storage is less than 64 GB, the installation may fail or the system may experience severe lag.
1.2 Download the ISO Image
Visit the official download page: https://www.deepin.org/en/download/
Select the appropriate architecture based on your processor:
| Architecture | Applicable Platforms | Notes |
|---|---|---|
| AMD64 (x86_64) | Mainstream Intel / AMD PCs | Most commonly used |
| ARM64 | Phytium D2000/D3000/E2000/S2500/S5000C, Kunpeng 920 | For ARM devices (primarily China-market) |
| Loong64 | Loongson 3A5000 (requires new-world firmware) and above | Must use balenaEtcher or dd command to create bootable USB |
| RISC-V | Specific development boards (Technology Preview) | Not intended for daily use |
1.3 Data Backup & Boot Settings
- Back up important data (especially for single-disk users and existing deepin 20/23 users).
- Disable Secure Boot: Enter BIOS and set Secure Boot to
Disabled. Otherwise, you may encounter issues such as inability to boot from USB, problems with out-of-tree kernel drivers, and system hibernation failures. - Verify boot mode:
- Computers manufactured after 2012: Use UEFI.
- Older devices (Legacy-only): Full-disk installation will work without adjustment.
2. Create a Bootable USB Drive
2.1 Prepare a USB Drive
- Capacity ≥ 8 GB
- The USB drive will be formatted during the process, so back up any data on it beforehand.
2.2 Recommended Tools
| Tool | Supported OS | Features |
|---|---|---|
| Ventoy | Windows / Linux / macOS | Set up once, then just copy ISO files to the USB root directory |
| balenaEtcher | Windows / Linux / macOS | Simple and easy to use; required for Loongson Loong64 |
| Rufus | Windows | Classic tool |
| dd command (terminal) | Linux | sudo dd if=/path/to/iso of=/dev/sdx bs=4M status=progress oflag=sync |
📌 Before using dd, confirm the USB device name via lsblk (e.g., /dev/sdb).
3. Installation
3.1 Boot from the USB Drive
-
- Insert the bootable USB drive.
- Restart the computer and press the shortcut key to enter the BIOS boot menu (common brands: Lenovo F12, HP F9, Dell ESC/F12, ASUS F8, Apple Intel-based Mac: hold
Option).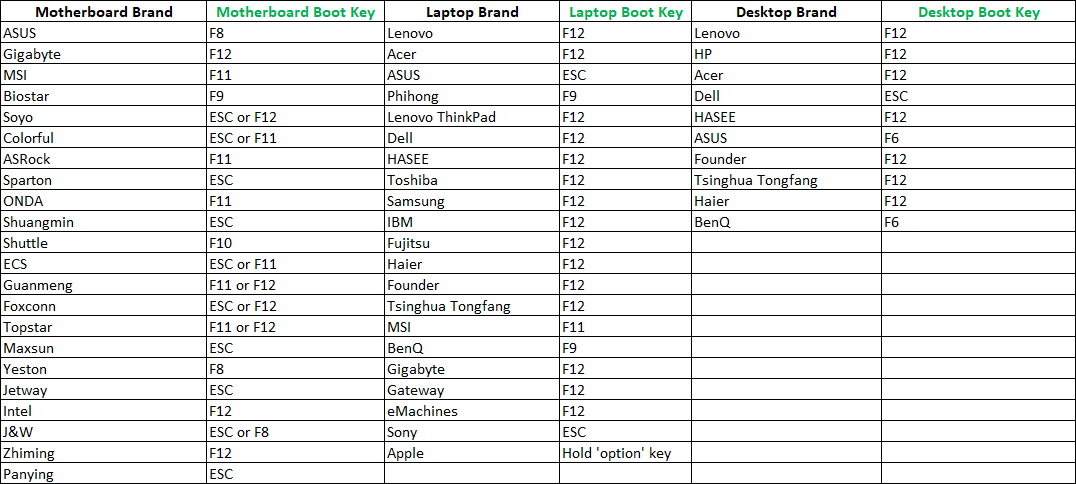
- Select the USB drive (e.g.,
UEFI USBorUSB device) to boot.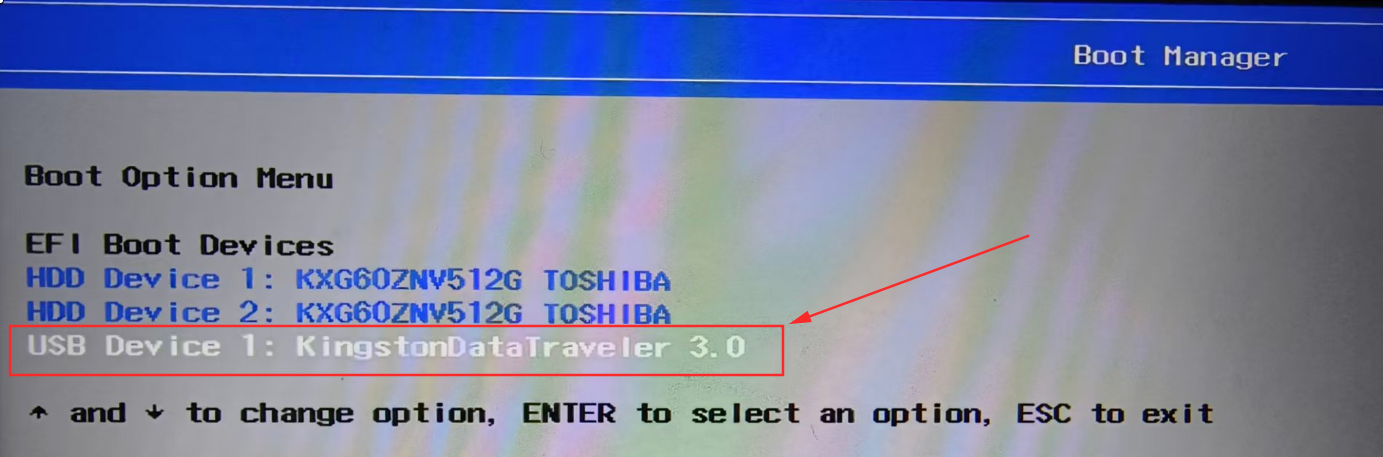
3.2 Select Installation Mode
After booting, you will see the following menu:
- Try Deepin Desktop 25: Live mode without installation; you can test hardware compatibility (Wi-Fi, Bluetooth, sound card, etc.).
- Install Deepin 25: Proceed with installation (recommended).
- Safe graphics: Use this when the normal installation mode fails to enter the graphical interface (boots with low resolution and software rendering; you will need to install graphics drivers manually after installation).
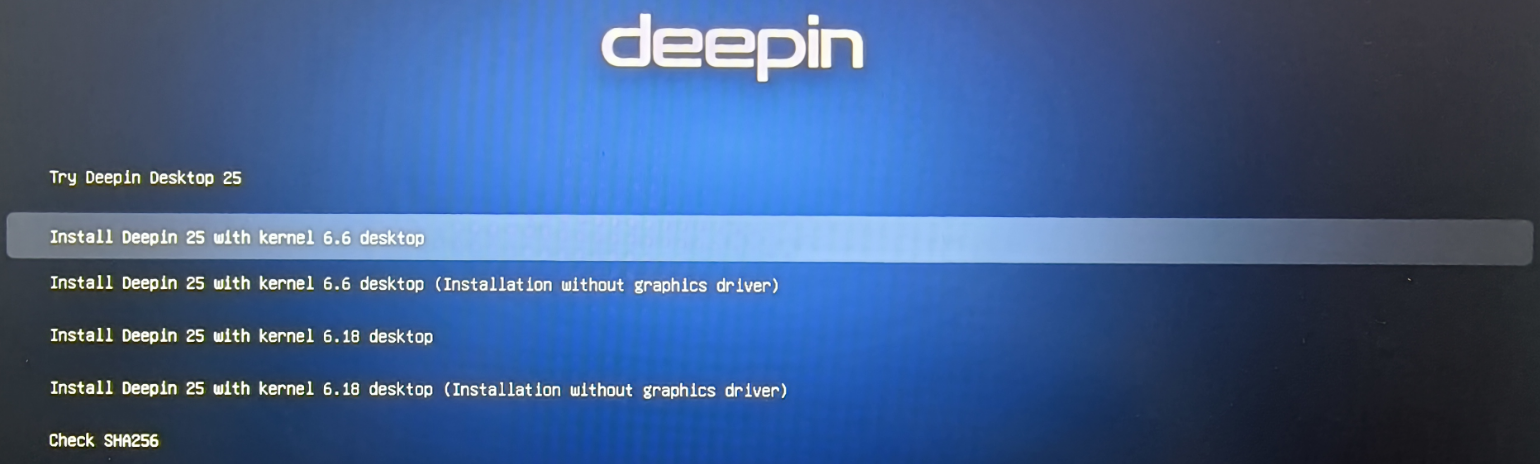
3.3 Select Kernel Version (Important)
- Newer devices (Intel Ultra series, etc.): It is recommended to select the 6.18 kernel for better driver support.
- Devices with non-upstream hardware: It is recommended to select the 6.6 stable kernel for better compatibility.
3.4 Installation Methods
Full-Disk Installation (Recommended for Beginners)
- Select one complete physical disk (note: not a partition).
- Automatically creates A/B partitions, supporting system rollback functionality.
- ⚠️ This will erase all data on the selected disk. Make sure to back up in advance.
- Dual-disk users: If the other disk contains important data, do NOT use full-disk installation (it will format the data disk). Use manual installation with custom partitioning instead.
Manual Installation (Custom Partitioning, for Advanced Users)
- Allows dual-boot on a single drive, or using LVM for flexible storage expansion.
- Recommended partition scheme:
| Partition | Recommended Size | Format / Notes |
|---|---|---|
| EFI | 300 MB | FAT32, required |
| swap | Equal to physical RAM (can be reduced or omitted if RAM ≥ 8 GB) | Swap partition |
| / (root) | ≥ 45 GB (allocate more if disk space permits) | ext4 / btrfs |
| /home | All remaining space | User data partition (can be separate) |
- If existing deepin 20/23 partitions are present, they must be formatted first (direct reuse of old partitions is not supported).
3.5 Special Notice for NVIDIA GPU Users
- Some NVIDIA GPU users (especially those with newer cards such as the 50-series) may encounter a black screen or inability to enter the graphical installer when installing the deepin 25 ISO. If you experience this issue, when the installer reaches the format confirmation screen, uncheck the "Include NVIDIA proprietary drivers" option.
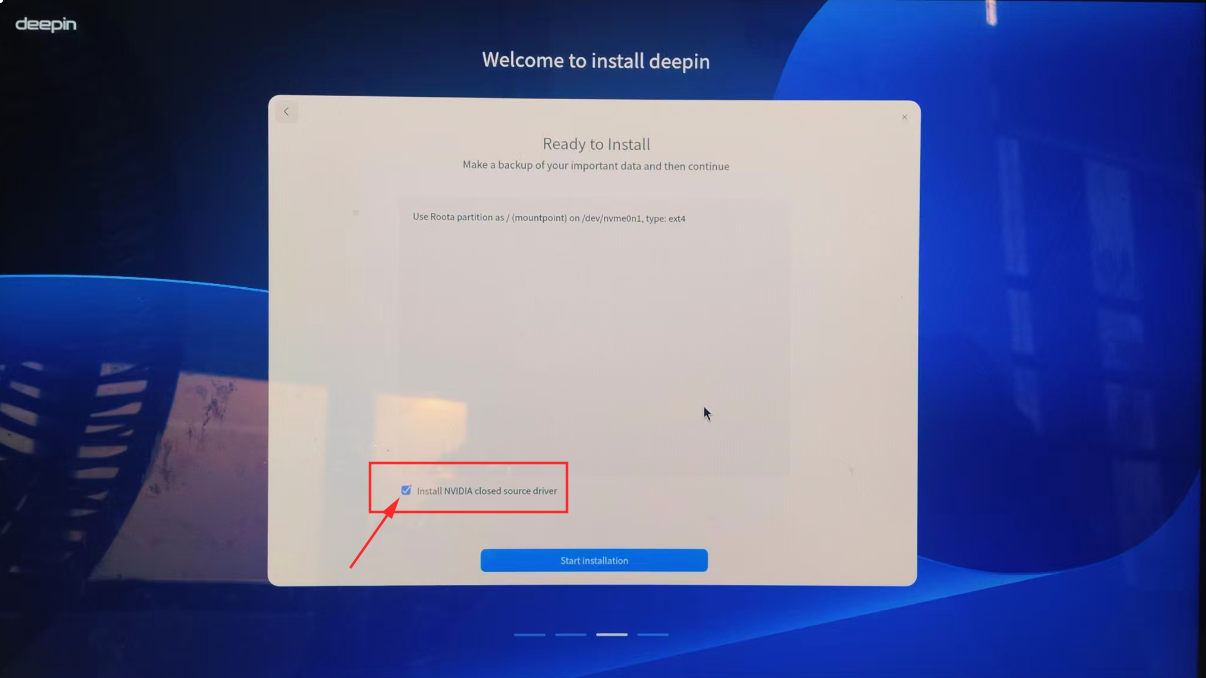
- After installation, the system will boot into the desktop using the open-source Nouveau driver. You can then install the proprietary driver.
3.6 Special Notice for Intel Arc and AMD 9000 Series GPU Users
Since the current system ships with a lower version of Mesa, these GPUs require a newer Mesa version to function properly. You can add the following HWE (Hardware Enablement) testing repository to update Mesa. Run in terminal:
Add the following HWE repository line below the existing system sources (after pasting, press Ctrl+O to save,Enter to confirm,then Ctrl+X to exit):
Run the following command in terminal to update the Mesa driver, then reboot:
Run the following command in terminal to verify the GPU is recognized:
Expected result: The output should contain strings like Intel Corporation Battlemage, Intel Arc, or AMD radeon.
Check the driver loading status:
Expected result: Under the GPU device information, find Kernel driver in use: — it should display xe or radeon, indicating the GPU is properly driven.
4. Post-Installation Configuration
4.1 First Boot
- Remove the USB drive and restart the computer.
- If you see a "No bootable device" message, enter BIOS and change Boot Mode from
LegacytoUEFI, then reinstall. - Set up your username and password (avoid using special characters in the username). Once configuration is complete, you will enter the system.
4.2 System Update & Software Installation
- Update the system via Control Center or by running
sudo apt update && sudo apt dist-upgradein terminal. - Open the official App Store to install commonly used software.
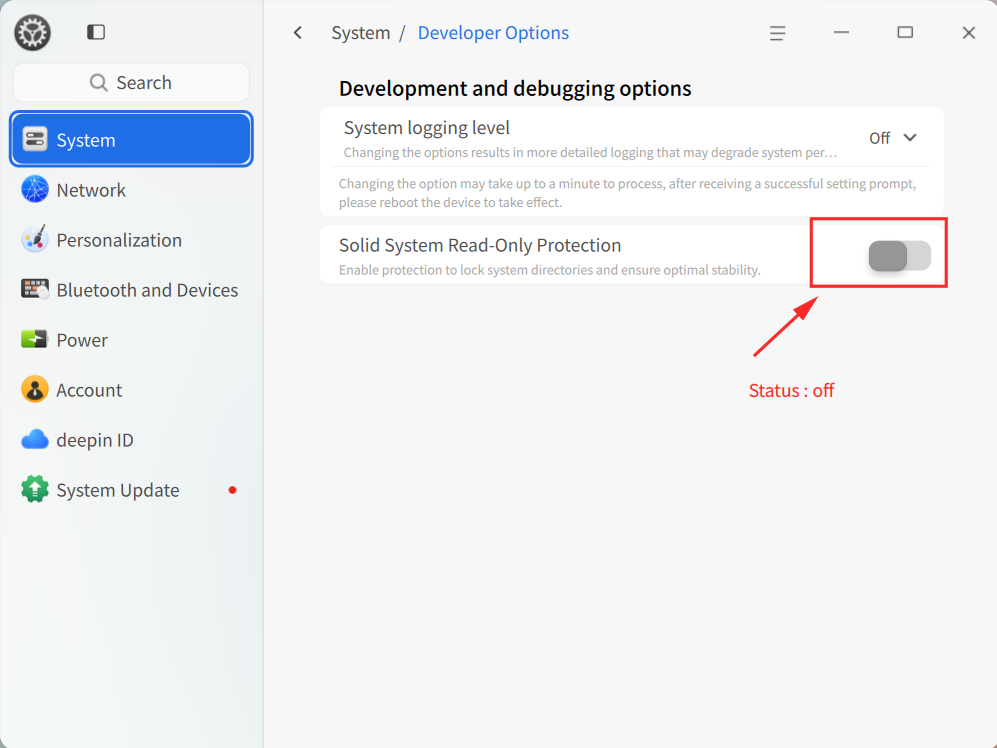
4.3 Developer Options: Disable Immutable System Read-Only Protection
deepin 25 enables the Immutable System protection by default. If you need to modify system directories (such as /usr), you must disable the read-only protection:
Method 1 (Command Line):
Reboot for the change to take effect.
Method 2 (GUI):
Control Center → System → Developer Options → Disable "Immutable Read-Only Protection" → Reboot.
📖 For more information about the Immutable System, please refer to: Immutable System Q&A
5. Quick FAQ
| Issue | Solution |
|---|---|
| Failed to boot from USB | Check if Secure Boot is disabled; confirm the USB drive is set as the first boot device in BIOS. |
| Black screen during installation (NVIDIA GPU) | Uncheck "Include proprietary drivers", then install drivers manually after installation. |
| No bootable device found after installation | Enter BIOS and change Boot Mode to UEFI, then reinstall the system. |
| Can I upgrade directly from deepin 20/23 to 25? | No. You must download the new ISO and perform a clean installation. Back up your /home data beforehand. |
| Can I install deepin on a Mac? | Only on Intel-based Macs. Hold Option at startup and select EFI boot; Apple Silicon (M-series) is not supported. |
| What should I note for virtual machine installation? | Enable EFI boot, allocate ≥2 CPU cores, ≥4 GB RAM, and ≥64 GB disk. |
For more issues, please refer to: deepin 25 OS User Installation & Usage Q&A
6. Get More Help
We wish you a smooth installation and an excellent deepin 25 experience!